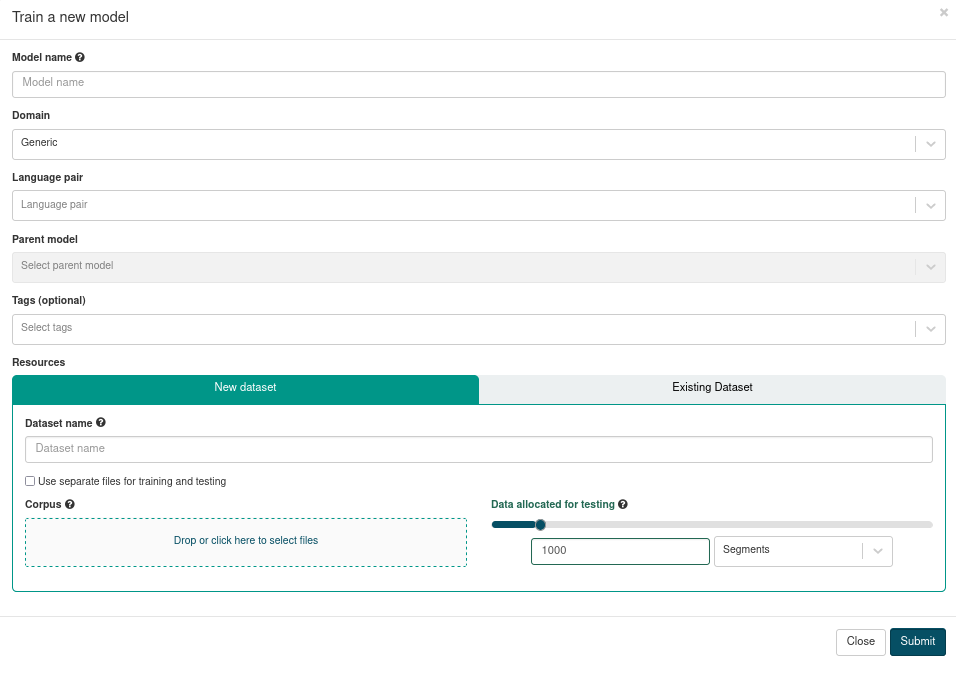
Create a new model
Click on Models in the header menu to go to the Models homepage.

Click on the + Train a new model button.

Fill in the form, select the data you want to train your model with, then click on Submit.
Detailed information is available below on how to complete the form and select your data.

✅ That’s it! Your training will start running shortly and appear as Training in the table. If you need to, you can cancel your training.
How to fill the form
| Field | Description | Mandatory |
|---|---|---|
| Model name | The model name should not exceed 50 characters and can only contain alphanumeric characters and .-_ |
yes |
| Domain | Select one from the drop-down list of possible domains. Default value is "Generic". You can change this value during the model deployment. | yes |
| Language pair | Either start typing the 2-letter ISO code of the source language, or select a language pair from the drop-down list. You need to set the language pair to display the available baseline models (parent model). | yes |
| Parent model | This is the baseline model you will use as a starting point to which you will customize with your own data. You can select one from the list of SYSTRAN baseline models or pick one of your own models if you have already trained one. SYSTRAN baselines models are regularly updated. | yes |
| Tags | Tags are flags associated to your training, for example to indicate it is an experiment. Select one or several from the drop-down list. | no |
| Resources | This is where you indicate which data is to be used to customize your model. You can either create a new Dataset at this step (see "Use a new Dataset" below) or use already created Datasets. You can use several Datasets. | yes |
Select training data
You can either create a new Dataset or use Dataset(s) created prior. Please refer to the Resources documentation page for more information on Datasets.
Use a new Dataset
If this is your first time training a model on ModelStudio, you probably have not created a Dataset yet. You can create a Dataset on the Resources page or directly from the model creation form, as explained hereafter.

Choose a name for your Dataset. It should not exceed 50 characters and can only contain alphanumeric characters and
.-_Upload the data you want to use. You can either:
Drag and drop your files into the Corpus box, or
Click on it to open a file explorer and select your files.
The files appear under the Corpus box. Click on the trash bin to delete a file.
Only two formats are currently accepted : application/x-tmx+xml (TMX files) and text/plain (raw bitext where the source and target segments are separated by a tabulation).
About bitext files
Bitext files should start with the following header.
#TM
#XX YY
Where XX stands for the source langue code, and YY for the target language code. The two language codes should be separated with a tabulation.
Test set creation
If you have already prepared a test set, you can tick the box indicating you want to use separate files for training and testing (1). Another drag-and-drop box appears for the testing data.
You can also split your data into training and testing sets. Either choose a fixed number of lines to extract (Segments), or a percentage value (Percentage). Move the cursor to increase or decrease this value. Default is a value of 1000 segments (or 10 % if you choose to use percentages).
Warning
Please note that strating with ModelStudio 1.4.0, Datasets and Evaluations have an expiration date, after which they will be automatically deleted.
Use existing Dataset(s)
To use one or several already existing Dataset(s), click on the Existing Dataset tab.

Tick the box(es) corresponding to the Dataset(s) you want to use for your training.
Using more than one dataset
It is possible to use multiple datasets for a training. However, the datasets need to be created beforehand so you can select them when creating your new model.